Good neat appearance is always in fashion. And if many original accessories were created for women, then for men the tie is considered the most important. If you don’t know how to tie a tie without help, take a few minutes to read our article.
Material Content:
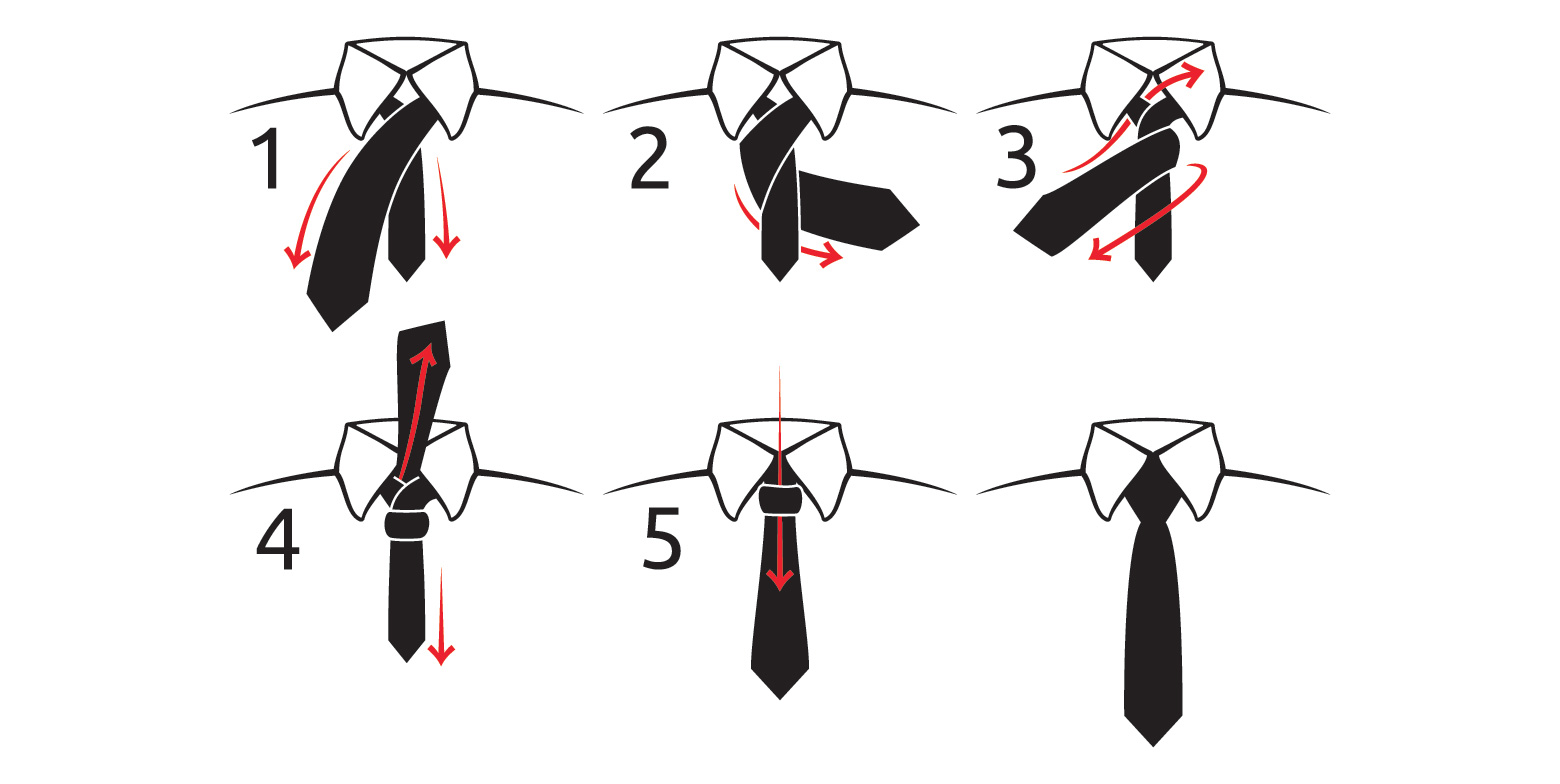
Classic tie knot
The classic bundle for decorating a tie can even be performed by a beginner. Classics always look beautiful and neat. The knot is suitable for any accessory.

How to tie a tie:
- Put the shirt and tie on the neck so that its wide edge (HK) covers the belt a little.
- HQ cover a narrow edge (HQ).
- HQ swipe perpendicular to the left to the left.
- Move the barcode to the right side on top of the criminal code.
- Pass the HQ into the loop on the throat, and then into the resulting loop.
- Pull up the end.
To get a beautiful result, follow a few simple recommendations:
- Tie the accessory exclusively on the shirt. Practice on the shirt you plan to wear with a tie.
- Put the barcode perpendicular to the bar so that the result looks neat.
- Do not tighten the knot very tight. Otherwise, internal weaves stand out. But if the ends are tightened loosely, the tie will look messy.
- Always straighten the fabric while creating the knots.
You can combine a classic knot with any official costume.
It fits perfectly into the office style, is suitable for visiting a restaurant or a romantic date, gives the image severity and elegance.
Simple Node Step-by-Step Guide
This option is very popular because it allows you to make a tie in a few moments.Since it is distinguished by subtlety and original form, it will make the image elegantly careless.
Step-by-step instruction:
- Put on the accessory. The wide edge (HQ) should be below the narrow edge (HQ), hanging down strictly to the left. Accordingly, the Criminal Code is located on the right.
- Move the HQ over the UK to the right so that they cross.
- Then HQ lead under the Criminal Code to the left. If you see the inside of the HQ, then you did everything right.
- Again bring the HQ over the UK to the right.
- Pull the bar from the inside, then from the bottom up to the loop on the throat.
- Again, pull the bar into a small loop that came out after previous manipulations.
- Tighten. If the length of the edges is the same, then the result should meet expectations.
Bow Tie Pattern
We are used to wearing a “butterfly” only for attending social events, but fashion trends have changed and now day dresses can be supplemented with such an accessory.
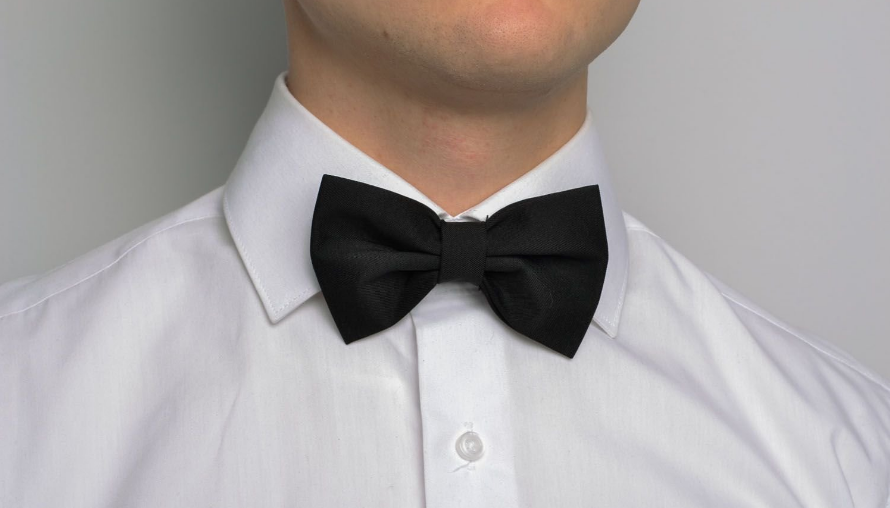
This tie knot looks very successful with a motley shirt, a shirt with a short sleeve, with shorts and jeans. Often in this way there are braces.
Daytime “butterflies” have a brighter color than classic evening ties. To create the first use denim, fur or knitwear, for the second - satin or silk. Despite the popularity, wearing such an accessory for work is considered bad form.
Putting on an already finished “butterfly” is considered a sign of bad taste. If elegance is important to you, then learn how to create one yourself.
Step-by-step instruction for tying:
- Hang the tie on the shirt so that the right end (PC) is just below the left end (LC). Ideally, if the place of thickening of the accessory is located strictly in the center.
- Throw the PC over the LC.
- Pass the PC from the bottom up into the loop that came out after the previous movements.
- Bend the LC so that its narrow part is in the center. The "butterfly" should already be looming. Turn the fold to the right.
- Pull the PC from top to bottom in front of the folded LC.
- Turn the PC to make a hole on the right.
- Put the accessory PC on your shoulder and bend its widest part.
- Put the bottom of the PC into the loop that came out after the fourth step.
- Pull the loop - this will tighten the center nodule.
- Correct the "butterfly", make it symmetrical.
The most difficult nodes do it yourself
If you want to tie your tie in an original way, we suggest that you familiarize yourself with several interesting ways.
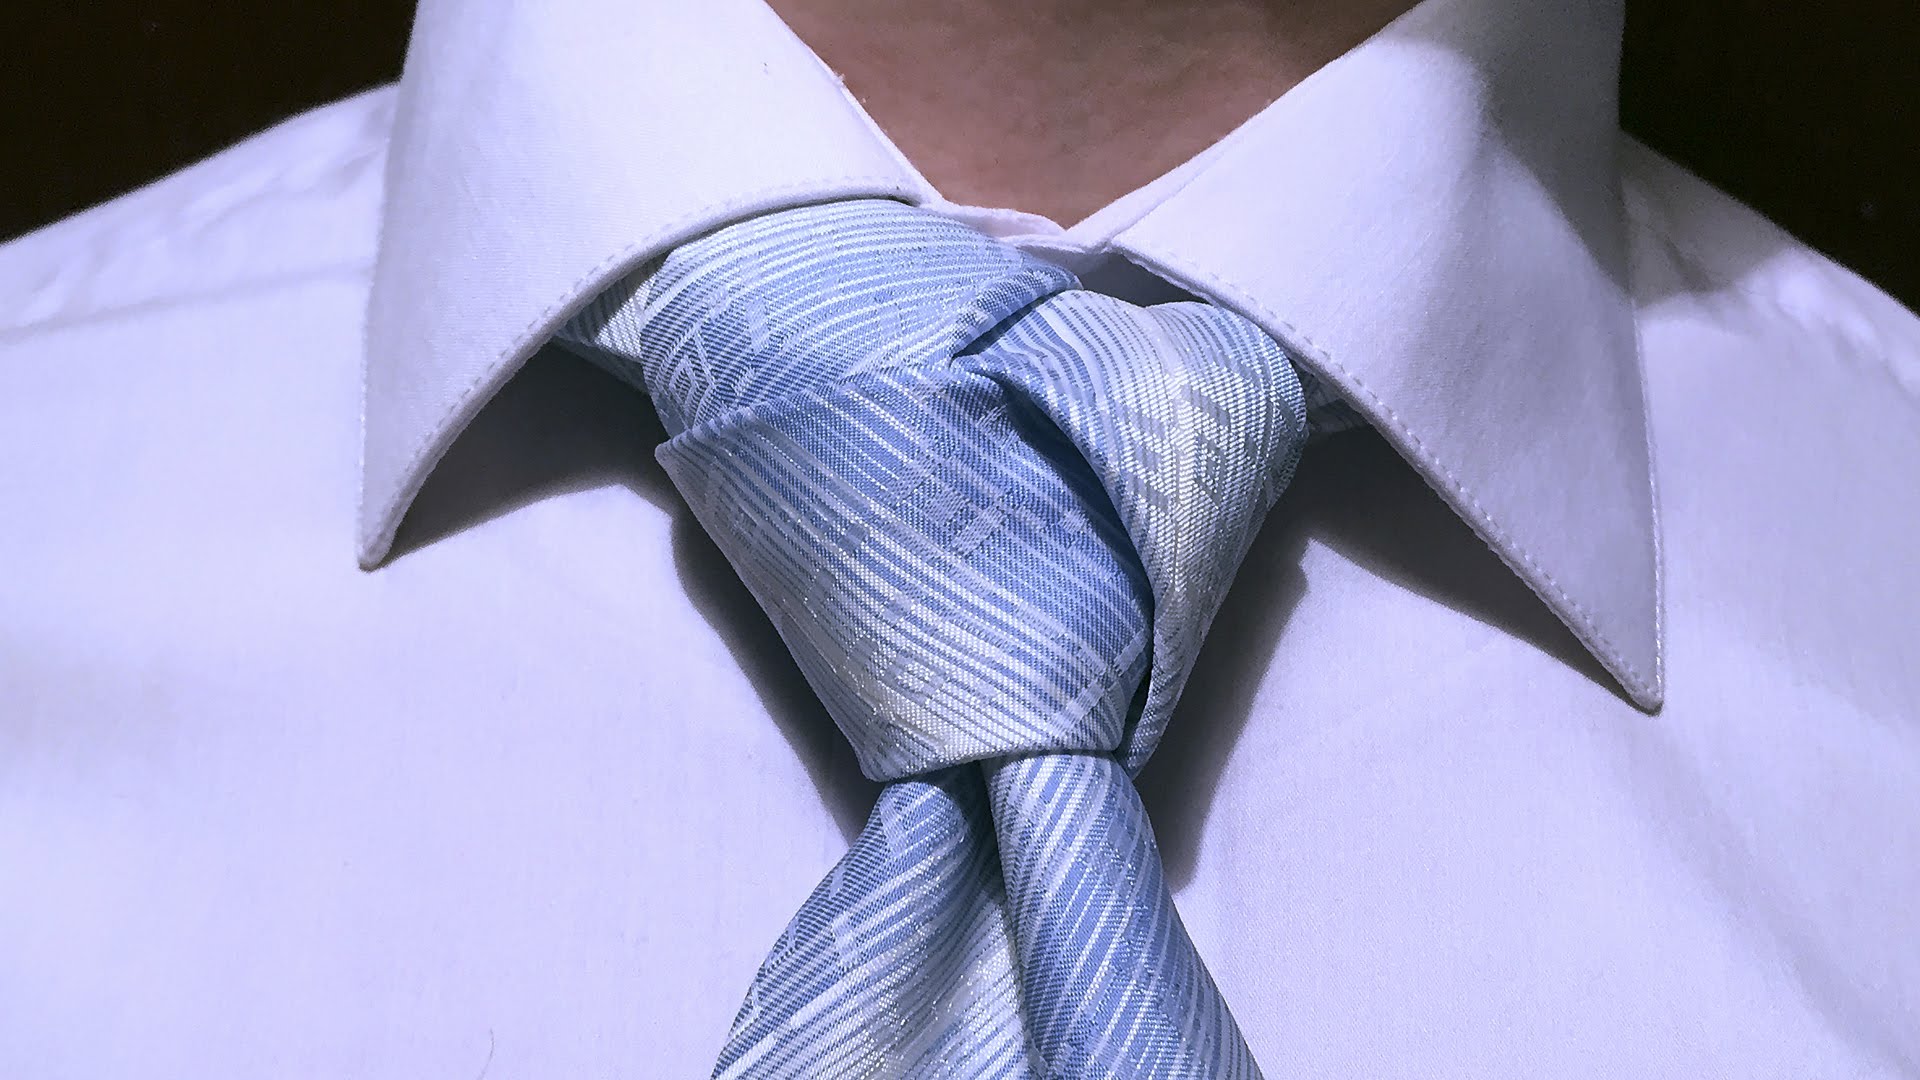
Eldridge Knot
To execute this node, you must:
- Wear a tie according to an already familiar pattern. The wide edge (HQ) of the accessory should touch the belt buckle. The main actions are performed with a narrow edge (UK).
- Put the CC on the bar to get a crosshair.
- Wrap barcode from left to right.
- The Criminal Code is pulled to the neck, inserted into the loop formed.
- Wrapping the UK one time, pull the tie to the left.
- Create a “face” of the beam by horizontally shifting its barcode from left to right, then thread it under the resulting loop.
- Stretch the criminal code down and to the left, then pass it under the barcode.
- Stretch through the loop that arose after the previous action.
- Pull the UK to the left and gently tighten.
- Throw the smaller end under the collar of the accessory, pull left and down.
- Repeat the same action, just pull to the right.
- Pass through the loop on the outside of the “structure”.
- Pull the smaller end to the left and tighten it slightly.
- Hide the “balance” of the Criminal Code under the collar of the shirt.
- Correct the position of the node.
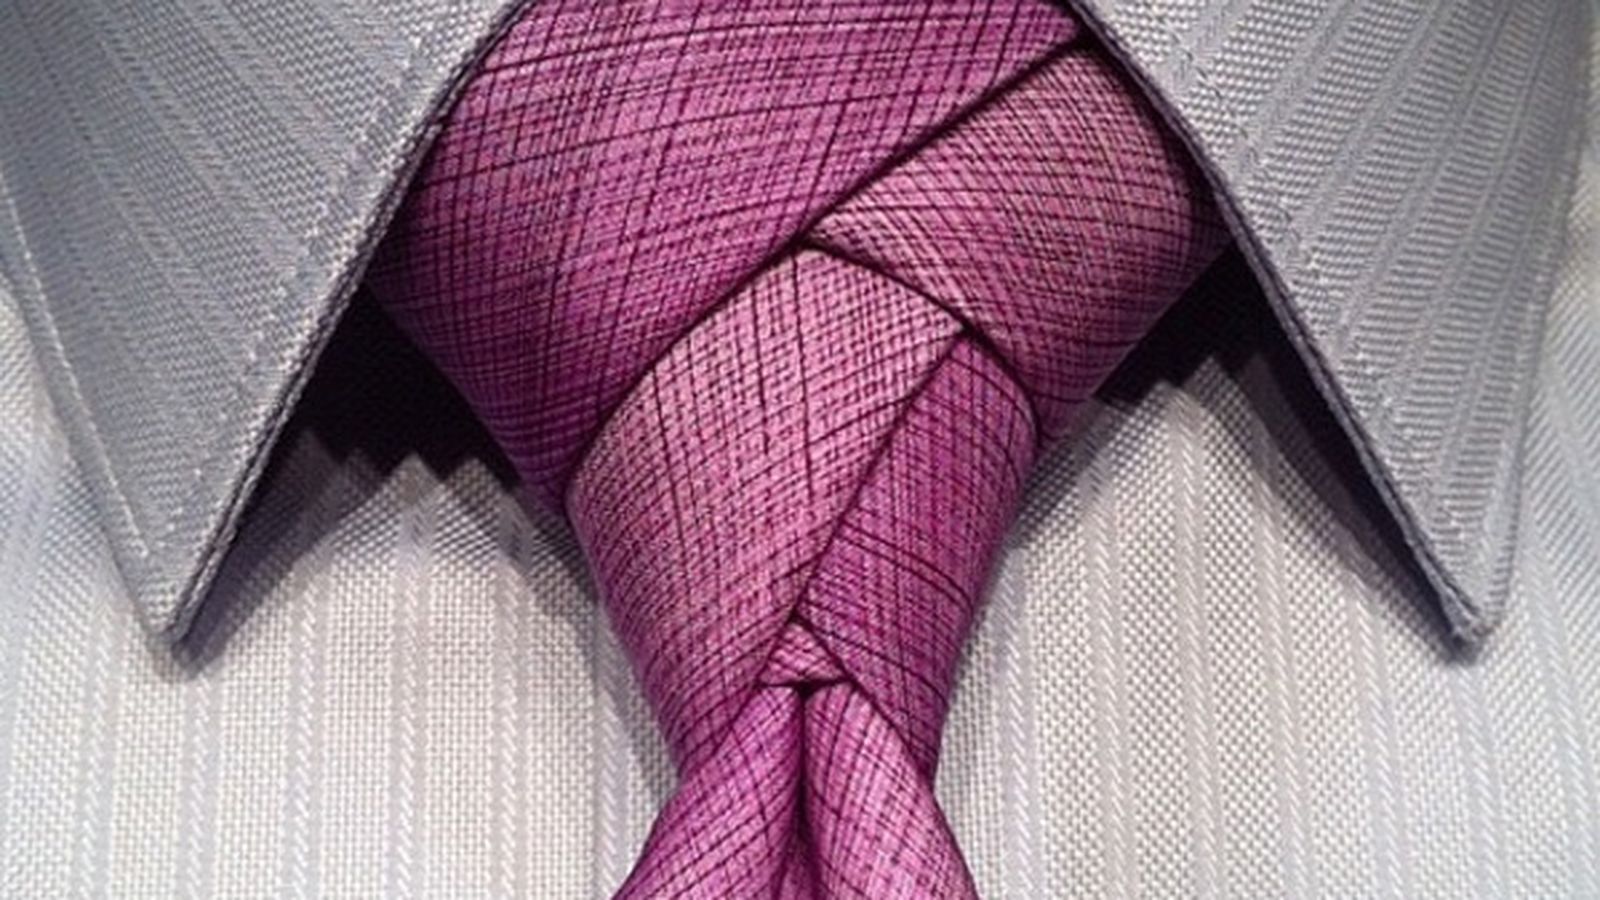
Trinity
To create a Trinity, you must wear a tie and cross a wide edge (HK) and a narrow edge (UK). Make sure the latter is on top.
Next you need:
- Pull the Criminal Code to the neck and stretch it under the collar that appears. Wrap once and pull left.
- Wrap barcode from left to right.
- Repeat the first action.
- Form a “face” of the node. For this, the barcode must be horizontally shifted from left to right and threaded under the loop that appears.
- Pull the criminal code through the loop.
- Repeat the second action.
- Pass the bar through the loop and tighten it slightly.
- Throw the Criminal Code under the resulting collar on the left.
- Correct the location of the node.
Dual windsor
Suitable for connoisseurs of originality in detail.

To create it you need:
- Put on a tie, cover the CC with the Criminal Code.
- Pull the bar up through the loop, lower it down and bring under the UK.
- Take the barcode to the right, then to the left, but already above the CC.
- Re-stretch the bar through the loop.
- Insert the bottom of the LC under the horizontal jumper and pull down (the action is performed twice).
- Tighten the beam.
Pratt
Pratt looks harmonious in the office and at a chic party.

To create it you need:
- Put the accessory face down.
- The end of the Criminal Code should almost reach the navel, in all actions only the CC is involved.
- Cross the ends of the accessory, the UK is on top.
- Pull the bar up and pass over the resulting loop.
- Wrapping the collar of a tie, pull the bar to the left.
- Create the “face” of the node in an already known way.
- Pass the bar through a loop on the outside of the assembly.
- Pull the bar down and tighten a little.
- Correct the finished accessory.
How to tie a narrow tie
To tie a narrow tie, it is recommended to use a small knot. Since this stylish accessory is suitable for casual style, light untidiness and licentiousness in its appearance is allowed.
Granchester is a rather large knot, so it should be used exclusively for long narrow ties.
To create it, you need:
- Throw a tie around the neck so that the wide end “looks” to the left, and the narrow end covers it.
- With a familiar movement, redirect the wide part to the right.
- Bend the narrow end again. As a result, 2 full turns should come out.
- Next, pass the wide end from the bottom up into the neck loop and round the resulting knot with a tie from above to the right side.
- Send the left end to the left side so that it goes around the knot and goes from bottom to top in a loop on the throat.
- If you did everything right, you should get a loop. In it you again have to pass a wide part of the tie.
Elastic accessory
This accessory is called regatta. He was invented by a young yachtsman who did not want to waste time tying a tie. Therefore, the man simply cut the finished knot in the back and sewed a buttonhole and buttonhole there. Regatta quickly gained popularity, it began to be actively used by men of various professions. But the combination of such a tie with a business suit would be extremely inappropriate.
Today on sale there are regattas having:
- factory knot and clasp around the neck;
- finished knot, straps with hooks;
- elastic fixer, which allows you to create a knot without outside help;
- a stretching collar of the same color as the tie.
Don't know how to tie a tie step by step in a classic way?
Follow just a few simple steps:
- Put the tie face down.
- Fold it over the gum down on yourself.
- Round the wide side to the narrow side.
- Insert the end into the loop and pull it sharply down.
- Pull the ends to create a knot.
- Try on the accessory, fasten, adjust the length.
- Take off your tie and sew the knot with matching thread.
So that the accessory does not spoil your image, try not to break a few simple rules:
- The tie should match the color of the clothes. Harmony never goes out of style.
- Choose an accessory according to your physique and height.
- A wide knot will visually reduce a short neck.
- If you wear a classic tie, do not use accessories (scarf or suspenders) anymore.
- A narrow tie is considered a youth option, so it is suitable for guys and young men. It is better for mature and old men to wear the classic version.
Do not worry if you do not succeed immediately. Be patient, carefully study the instructions described and try your hand in front of the mirror. A correctly selected tie looks advantageous in any image.


