Stylish, elegant and beautiful, like the sea - all this is an ode to the blue jacket. The unusual design of the nails perfectly emphasizes the wonderful taste of the owner.
Material Content:
Fashion trends and novelties 2019
Nail fashion in 2019 is somewhat similar to the trends of recent years.


For modern nail art, everything is also characteristic:
- different forms of nails;
- gradient (ombre);
- drawings;
- natural motives;
- geometry, negative space;
- French classic and moonlight manicure;
- stamping.


Distinctive features of the nail fashion are:
- juicy shades: emerald, blue, especially purple;
- metal effect: the use of rubbing, spangles of silver and gold, small shimmer, broken glass, rhinestones;
- blue jacket with its various variations.
Ideas for a contemporary blue nail design
")

")
You can wear a classic white jacket for months, but there are times when you really want something new. In this case, take a chance and make a blue jacket on the nails. He will look exactly the same feminine and elegant, giving the hands of his mistress well-groomed, but at the same time add novelty and zest to the familiar look. As a bonus, you can make it on both short and long nails.
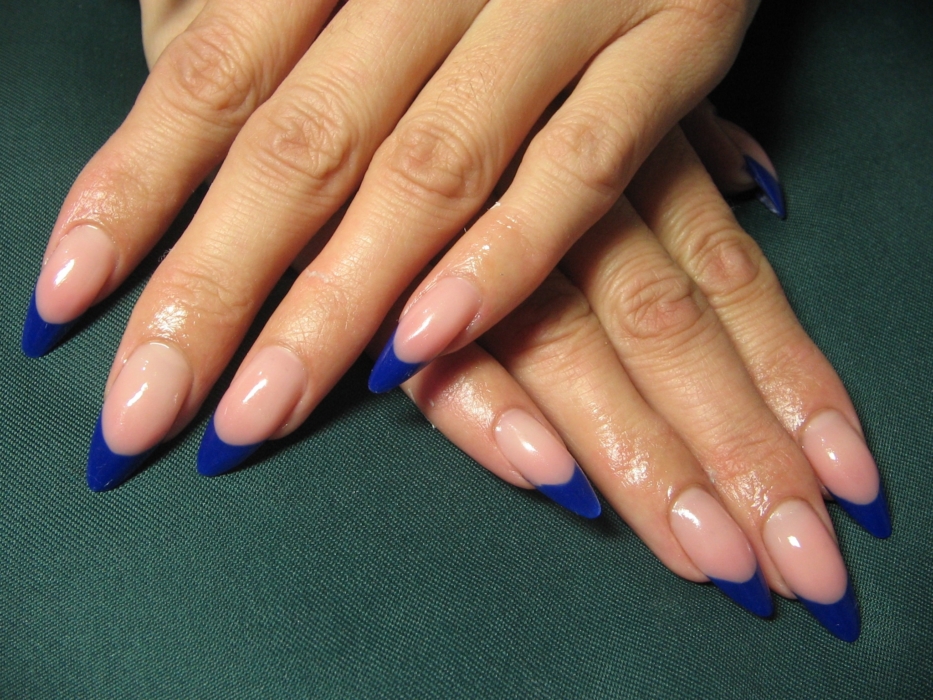
Classic


It sounds unusual, but the blue jacket may be classic.
For a french manicure of marine color you will need:
- liquid for dissolving varnish;
- lacquer beige or pale pink with a dense texture;
- deep blue coating;
- topcoat;
- thin long brush to create a smile or stencils;
- hydrogen peroxide (in case of cut).


Step-by-step instructions for creating a blue design:
- Wash your hands with antiseptic (antibacterial) soap and perform the usual manicure.
- Wipe the nails with a cloth moistened with liquid to dissolve the varnish.
- Coat the plates with beige or pink varnish and allow time to dry thoroughly.
- Using stencils or a thin long brush, draw blue smiles on the tips of the nails.
- After drying, cover with a finishing agent.
With sparkles and rhinestones


Sequins and rhinestones in manicure, unlike diamonds on the body, are appropriate to wear not only in the evening, but also in the daytime.


For a sparkling blue manicure you will need:
- liquid for dissolving varnish;
- basic coating of transparent color (will help protect your nails from excessive yellowness when using saturated bright shades);
- lacquer beige or pale pink with a dense texture;
- saturated blue hue;
- white varnish;
- topcoat;
- rhinestones;
- loose sparkles;
- dots or lemon stick;
- thin long brush to create a smile or stencils;
- hydrogen peroxide.


Step-by-step instructions for creating a brilliant design:
- Wash your hands with antiseptic (antibacterial) soap and perform the usual manicure.
- Wipe the nails with a liquid to dissolve the varnish.
- Perform a manicure on the ring fingers. Apply a clear base agent and allow time to dry thoroughly.
- Cover the nail plates completely with a blue hue.
- Without waiting for complete drying, sprinkle with sparkles.
- Cover the manicure with a clear topcoat.
- Proceed to design on all other fingers. Cover your nails with beige (pink) varnish and wait until it dries completely.
- Using stencils or a thin long brush, draw blue smiles at the tips.
- After drying, cover the nails with a finishing agent.
- Without waiting for drying, with the help of a dots or lemon stick, lay a few rhinestones on the border of the blue smile with the main color of the nail.
Using powder or rubbing
This season is also at the peak of popularity the metallic effect on the nails. And you can create it very quickly using a mirror or pearl rub.


To create a manicure you will need:
- liquid for dissolving varnish;
- transparent base coat;
- lacquer beige or pale pink with a dense texture;
- coating a deep dark blue hue;
- finishing agent;
- powder (rub);
- thin long brush to create a smile or stencils;
- hydrogen peroxide.
Step-by-step instructions for performing nail design:
- Wash hands with antiseptic (antibacterial) soap and perform a manicure (European or trimmed).
- Wipe the nail plate with a cloth moistened with liquid to dissolve the varnish.
- First make a manicure on the ring fingers. Apply a clear base coat and allow time to dry thoroughly.
- Coat the plates with a dark blue color.
- Rub in and remove excess.
- Cover your nails with a finish.
- Proceed to manicure on all other fingers. Apply beige (pink) varnish and allow time to dry thoroughly.
- Using stencils or a thin long brush, draw smiles on the tips of the nails in blue. Do not despair if there are no stencils, they are easy and simple to cut from ordinary paper or glossy stickers.
- After drying, topcoat.
The same manicure can be performed using gel polish.
With drawing


The blue jacket in itself is unusual and elegant, but just like porridge can not be spoiled with oil, French sea manicure can be made even more interesting by adding a picture.


There are several design options with a pattern and in both cases the same materials and tools will be needed:
- liquid for dissolving varnish;
- transparent base coat;
- lacquer beige or pale pink with a dense texture;
- saturated blue hue;
- finishing agent;
- white varnish;
- thin long brush to create a smile or stencils;
- sewing needle;
- brush to create a picture;
- hydrogen peroxide.


Step-by-step instructions for creating a picture on one nail:
- Wash hands with antiseptic soap and perform the usual (European or trimmed) manicure.
- Wipe the nails with a liquid to dissolve the varnish. With the help of this manipulation, we will “dry” the nails by removing excess fat, thereby increasing the manicure wearing time (we will avoid early chips).
- All fingers except the nameless ones should be coated with beige (pink) dense varnish and allowed to dry thoroughly.
- Then, using stencils or a long brush, draw a smile on the tips of the painted nails in blue. The French arc can not only have a semicircular shape, but also be square or triangular.
- After drying, apply a top coat on the nails with blue tips, which will add resistance and additional shine to the manicure.
- Now you need to proceed to the ring fingers. Cover your nails with a transparent base and allow time to dry thoroughly.
- Apply blue varnish to the entire plate.
- After drying, drip with white varnish into the center of the nail and stretch the product in different directions using a needle or brush for drawing a pattern. Do not worry if the pattern turned out to be asymmetric or abstract, others will think that it is so conceived, and you carefully drawn each line (even if it is not).
- After drying, cover the nail plates of the ring fingers with a finishing agent.


Step-by-step instructions for creating a picture on several fingers:
- Wash hands with antiseptic soap and perform the usual manicure.
- Wipe the nails with a cloth dampened with liquid to dissolve the varnish.
- Perform a manicure on the little fingers and index fingers. Coat nails with a clear base and dry.
- To apply a varnish of a blue saturated shade.
- After thorough drying, cover the nail plates with a clear topcoat. Important: when using a varnish with a matte effect, further coatings are not required.
- Proceed to perform manicure on all other fingers. Apply a beige (pink) dense coating and allow time to dry thoroughly. It is important to use an opaque thick varnish, since if there are any imperfections on the nails, it will help to hide them.
- Using stencils or a long thin brush, draw smiles on the tips of the plates in blue.
- Then, without waiting for the varnish to completely dry on these fingers, drip a drop of white on the base of the nail bed of each of them.
- Using a needle or brush to apply a pattern, stretch these drops into an abstract pattern or depict a few rhombuses. The main thing is that the picture should remain at the bottom of the plate without rising.
- After drying on the resulting drawings, drip another drop, but already blue, and again stretch into the pattern.
- Then cover your nails with a clear topcoat.

")

No matter how complicated the blue jacket at first glance seems, it is no more difficult to complete it than the classic white. Any beginner, if desired, will easily and simply make marine nail art at home in just half an hour.


