French manicure is a universal design option for nail plates. It is suitable for any occasion - both for workdays, and for the image of your own wedding. For beautiful nails, you don’t have to go to the salon, you can make a neat jacket even at home.
Material Content:
Classic french manicure
The classic French was invented by a designer from the USA. Before the next show, he decided to paint the tips of the nails of his models with white varnish. This version of manicure was very much liked by the viewer of the fashion show and became a real sensation.
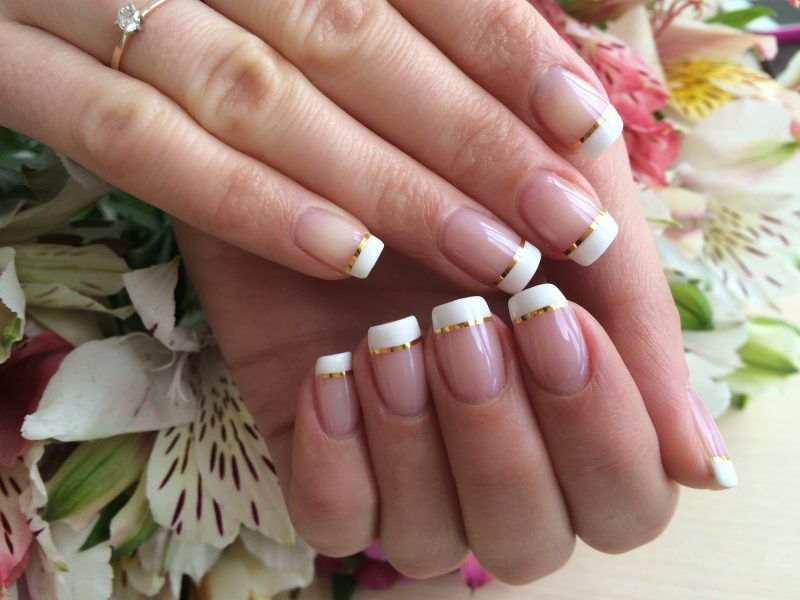
It turned out that it blends perfectly with any outfit and accessories.
Today on sale you can find special sets for manicure service at home.
Their classic options include:
- basic transparent coating;
- white varnish;
- colorless fixing agent.
You also need to take a thin brush for nail polish, cotton buds and nail polish remover.
Performing the manicure in question is very simple:
- First of all, the prepared prepared nail plates are covered with a base layer. It is very important to wait until it is completely dry.
- The crescent is drawn with the tip of a thin brush on the outer edge of the nail with white varnish. All irregularities are easily corrected with cotton swabs moistened with nail polish remover.
- When the white layer is completely dry, the manicure can be fixed with a colorless finish. It will extend the life of the design for a couple of days.
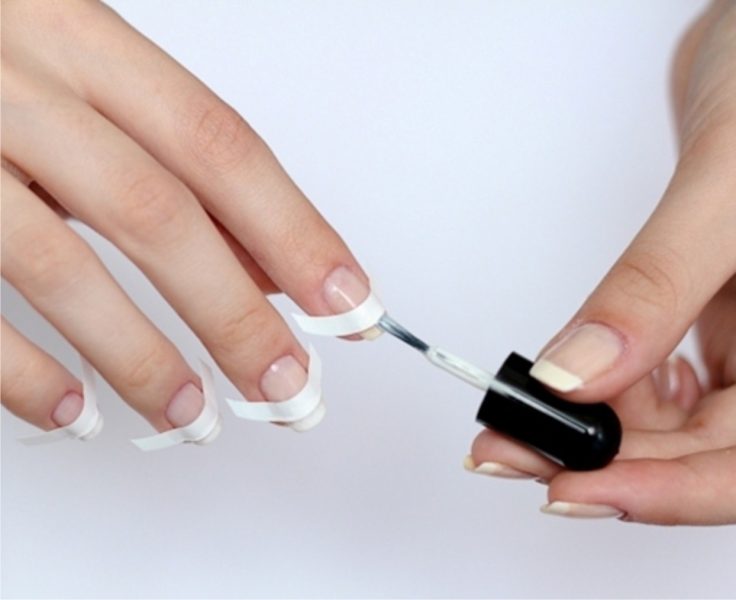
French for short nails at home
If you plan to do your own manicure for short nails, then it is worth arming yourself with special stripes-stickers. Since drawing a crescent on a miniature edge is not easy.Stickers make it easier for the girl.
In addition to the stickers will be used:
- matte pastel shade as a base;
- any white varnish;
- topcoat (colorless finish).
Before manicure, you need to steam the brushes in a warm bath and carefully remove the cuticle. A file or a special home apparatus for processing nails gives them the desired shape.
- On prepared dried nail plates, a matte base coat is applied.
- When the first layer is completely dry, sticker strips are glued. Their upper rounded part should be located exactly before the start of the overgrown nail.
- The tip of the plate is painted white.
- After the second layer has completely dried, the strips are carefully removed.
- It remains to apply the finishing colorless tool.
Patterned French Manicure Ideas
French manicure with a picture allows you to make the image bright and harmonious. Color patterns can combine marigolds with accents on clothing or makeup.


")
To create a picture yourself, you need to take a thin brush and any number of colored varnishes. You can use glosses of different sizes, rhinestones, manicure "sand", etc.
- First, a French manicure is performed according to any of the schemes described above. Not only a colorless topcoat is applied.
- Any pattern is drawn on top of the nail plate with white brush tips and colored varnishes. For example, a flower, hearts, patterns, ladybugs, etc.
- Completes the "finish" procedure.
In creating a picture, you can use sparkles, rhinestones and other accessories. It can be placed on the remaining free part of the plate or directly on the white part. The original ideas of a French manicure with a picture can be found on the Internet and simply repeated on your own.
If a girl does not know how to draw, but really wants to complement her nails with a beautiful pattern, she should buy ready-made stickers. Today, such accessories for manicure can be found for almost every taste, from the simplest flowers to detailed images of cartoon characters and comics.
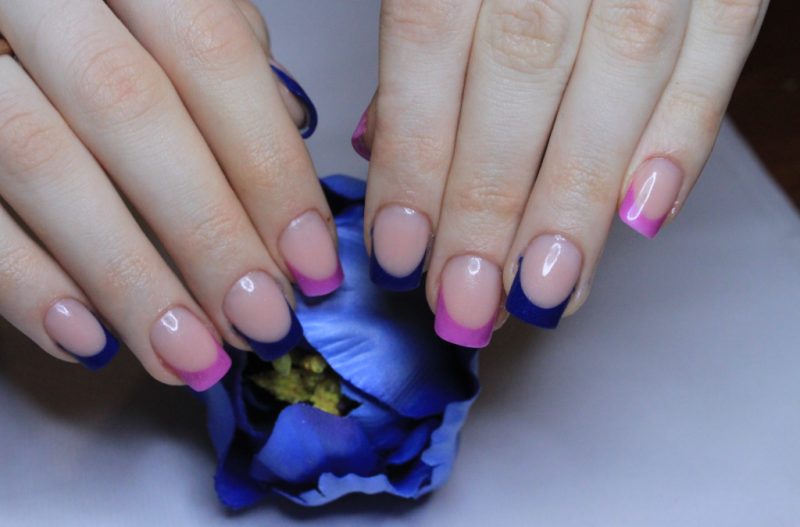
Perfect color jacket
Color jacket becomes a bright accent in the female image. For him, you can choose any shade from black to bright yellow.
When designing nails will be used:
- basic matte finish;
- sticker strips;
- colored varnish;
- colorless fixing agent.
First, a trimmed or hardware manicure is performed. Nails need to be given the desired shape, remove the cuticle.
And then:
- A matte base is applied.
- After the first layer has dried, stickers for the jacket are placed on the nails so that their overgrown tips remain free.
- The part after the sticker is painted over with the selected colored varnish.
- After the second layer has dried, the plates are coated with a colorless base agent.
The manicure option looks very interesting when all the nails are painted with varnishes of different bright colors.
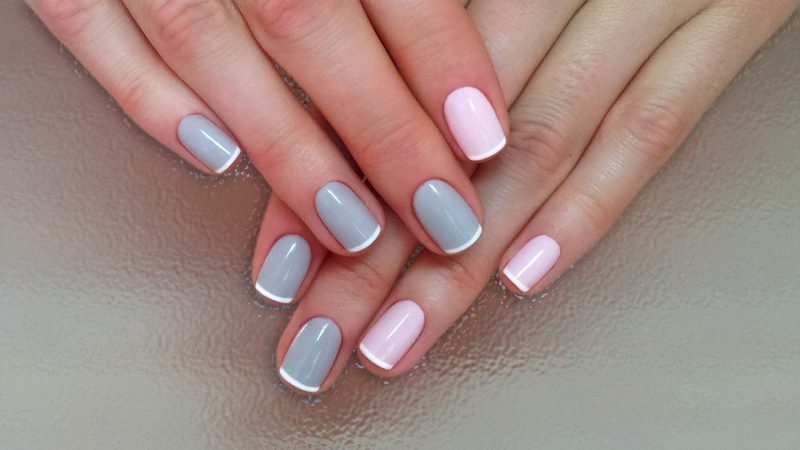
French manicure gel polish
Even French manicure gel polish can be done independently at home. Such design, with proper care, will last 2-3 weeks on nails.
For manicure you will need to use:
- buff;
- special tool for degreasing;
- gel varnishes - snow-white and light pink;
- colorless base gel polish;
- a primer;
- UV lamp;
- finish top.
Before starting the design of the nails, you need to remove the old varnish and give the nails the desired shape. The cuticle is very carefully removed, and the nails are degreased with a special tool.
- Nails are buffed. If they are strong and healthy, you can use the hard part of it. Processing is carried out in the direction of nail growth.
- A primer is applied to the nail plates. You need to wait a few seconds until it evaporates.
- The base is distributed in a thin layer and dried using a UV lamp.
- The main layer of gel polish (light pink) is applied. It is also drying out. If necessary, the step is repeated.
- White line is drawn "smile". To do this, you can use special stickers, a varnish brush or a thinner manicure.
- After drying, a second coat of white gel polish is applied.
- The top is used. It is dried out.
It remains to remove the sticky layer and apply an oil-based moisturizer to the nails. At this stage, manicure, it will not degrade the quality of the coating.
Millennium French or brilliant manicure
Fashionable millennium jacket is an improved version of the traditional manicure in question. The natural shade of the plate is preserved and the tip of the nail stands out. This is done with a brilliant sparkling decor. You can spread the flickering composition on the entire tip of the nail or decorate the white part in this way.

Initially, the design of gel polish is carried out according to the standard scheme. At the stage of drawing a "smile", the gel is mixed with the selected shiny glitter. Next, the material is laid out on the tip and dried in a lamp. The manicure also ends according to the standard scheme.
When using ordinary varnish, its transparent version is mixed with sparkles and sparkling sand. Next, a brilliant manicure is performed with stencils that will help to create a neat line of "smile". At the end, a transparent coating is applied.
Lunar french manicure
Lunar manicure differs from the classical one in that the area of the moon is highlighted in a contrasting shade, and the rest of the nail plate is completely covered with another selected color. By the way, the hole at the bottom of the nail can simply be left unpainted.

")

Making a manicure with a design called “moonlight” at home is very simple. First, the entire nail is painted with a contrasting shade according to the standard scheme. Then a special sticker is glued to the lunula, and the rest is covered in a different color.
Or you can immediately cover the lunula with a sticker, and cover the remaining nail with gel or ordinary bright-colored varnish. In this case, the lower "smile" will simply remain unpainted.


